 Save
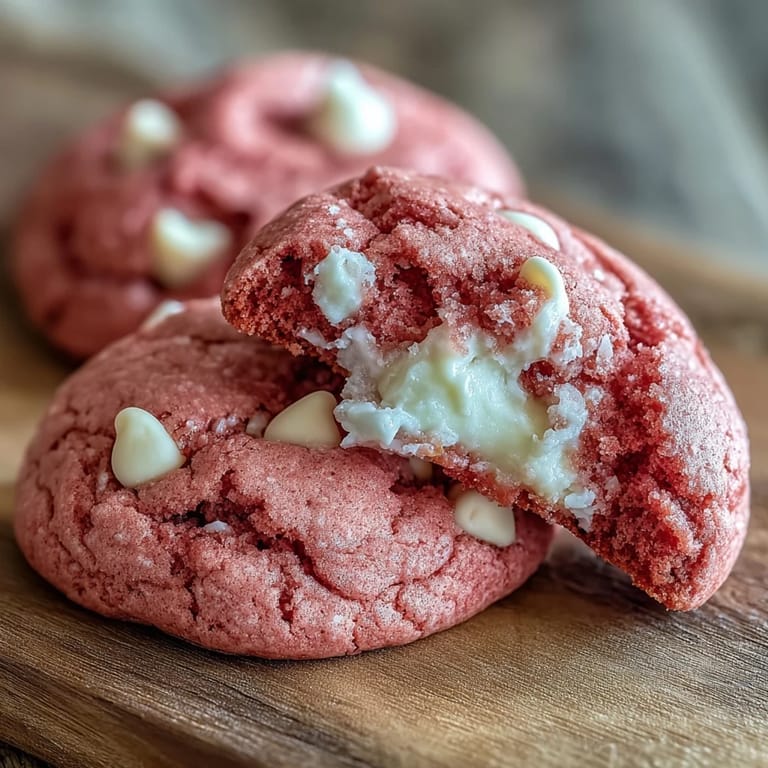
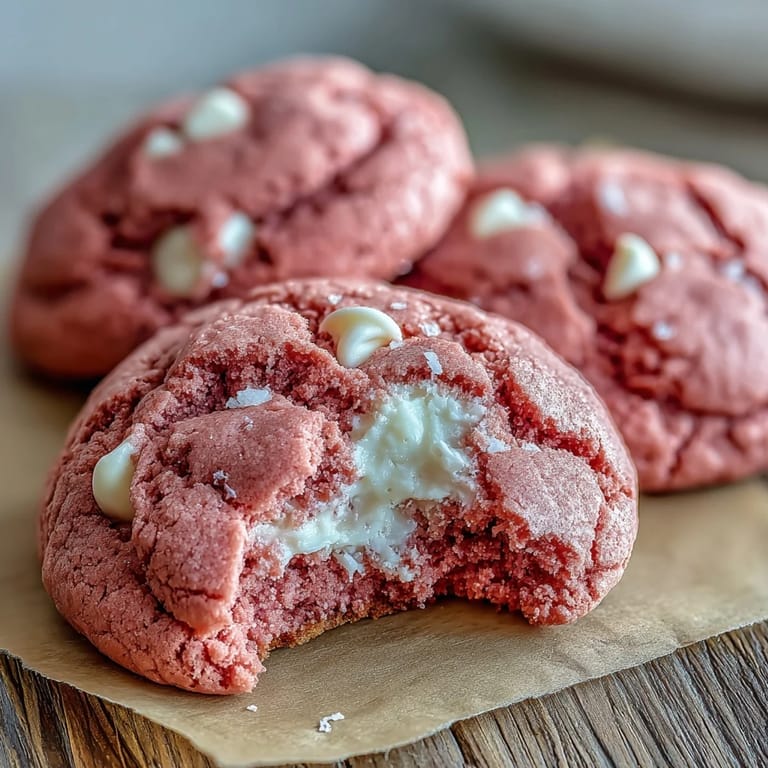
Save The kitchen smelled like butter and sugar when I pulled these out of the oven for the first time, and honestly, I wasn't sure what to expect. I'd added way more pink coloring than the recipe called for because I wanted them vibrant, almost electric. When my neighbor peeked through the window and asked if I was baking for a baby shower, I laughed and told her no, just a regular Tuesday. These cookies don't need an occasion, they create one.
I made these for my daughter's school bake sale once, and she came home with an empty container and three requests for the recipe. One mom told me her son, who usually hates cookies, ate four of them standing at the table. I think it's because they don't taste like they're trying too hard, just sweet, buttery, and a little bit magical because of the color. That night, my daughter asked if we could make them every week, and we nearly do.
Ingredients
- All-purpose flour: The backbone of the cookie, giving structure without making them tough if you don't overmix.
- Baking powder and baking soda: Together they create the perfect balance of lift and chew, I learned the hard way that skipping one makes them flat or cakey.
- Salt: Just enough to make the sweetness pop and keep the flavor from feeling one-dimensional.
- Unsalted butter: Softened to room temperature is key, cold butter won't cream properly and melted butter will make them spread too much.
- Granulated sugar: Creaming it with butter creates air pockets that keep these cookies light and tender.
- Egg: Binds everything together and adds moisture, one large egg is all you need.
- Vanilla extract: Use the real stuff if you can, it makes a noticeable difference in the final flavor.
- Pink gel food coloring: Gel is better than liquid because it won't thin out your dough, and you control the intensity.
- White chocolate chips: They add creaminess and little bursts of sweetness that balance the pink perfectly.
Tired of Takeout? 🥡
Get 10 meals you can make faster than delivery arrives. Seriously.
One email. No spam. Unsubscribe anytime.
Instructions
- Whisk the dry ingredients:
- In a medium bowl, whisk together the flour, baking powder, baking soda, and salt until evenly combined. This step ensures you won't get pockets of leavening or salt in your cookies.
- Cream the butter and sugar:
- Use a hand mixer or stand mixer to beat the softened butter and sugar together for 2 to 3 minutes until the mixture is pale, fluffy, and almost doubled in volume. This is where the magic starts, so don't rush it.
- Add the egg and flavorings:
- Beat in the egg and vanilla extract until fully incorporated, then add the pink gel food coloring. Mix until the dough is evenly tinted and no streaks remain.
- Combine wet and dry:
- Gradually add the dry ingredients to the wet mixture, mixing on low speed just until the flour disappears. Overmixing will make the cookies tough, so stop as soon as it comes together.
- Fold in the white chocolate chips:
- Use a rubber spatula to gently fold in the white chocolate chips, making sure they're evenly distributed throughout the dough.
- Chill the dough:
- Cover the bowl with plastic wrap and refrigerate for 30 minutes. This step helps the cookies hold their shape and prevents them from spreading too thin.
- Preheat and prep:
- Preheat your oven to 350 degrees F and line two baking sheets with parchment paper. Don't skip the parchment, it makes cleanup so much easier.
- Scoop the dough:
- Use a cookie scoop or tablespoon to portion out the dough, placing each ball about 2 inches apart on the prepared baking sheets. They'll spread a bit, so give them room.
- Bake until just set:
- Bake for 10 to 12 minutes, until the edges are set but the centers still look slightly soft and underbaked. They'll firm up as they cool, and this is what keeps them chewy.
- Cool completely:
- Let the cookies cool on the baking sheets for 5 minutes, then transfer them to a wire rack. They're best once they've cooled completely, though I won't judge if you sneak one while it's warm.
 Save
Save There's something about the way these cookies look on a plate that makes people pause before reaching for one. My best friend once told me they reminded her of Valentine's Day, even though it was July. I think that's the beauty of them, they're nostalgic without being tied to a single memory, and every time I bake them, they create a new one. I've served them at birthdays, book clubs, and once, just because I needed something cheerful on a gray afternoon.
Storing and Keeping Them Fresh
These cookies stay soft and chewy in an airtight container for up to a week, which is longer than most cookies last in my house. I like to tuck a piece of parchment paper between layers to keep them from sticking together. If you want to freeze the dough, scoop it into balls, freeze them on a tray, then transfer to a freezer bag and bake straight from frozen, adding an extra minute or two to the baking time. I've also frozen baked cookies and they thaw beautifully at room temperature in about 20 minutes.
Ways to Make Them Your Own
I've added almond extract a few times when I wanted something a little more delicate, and it pairs beautifully with the white chocolate. A friend of mine swears by adding a few drops of rose water, which sounds fancy but is actually just a tiny bottle from the baking aisle. You can also press extra white chocolate chips on top right before baking for a more decorated look, or swap them out for dark chocolate if you want a less sweet contrast. One time I folded in freeze-dried raspberries and it added a subtle tartness that made them feel almost gourmet.
Serving Suggestions and Final Touches
These are perfect on their own with a cold glass of milk, but I've also sandwiched them with cream cheese frosting for a party and people went wild. They're soft enough to hold up to a filling without crumbling, and the pink makes them look like something from a bakery. If you're feeling extra, a light dusting of powdered sugar or a drizzle of melted white chocolate on top makes them look even more special.
- Press a few extra white chocolate chips on top of each dough ball before baking for a bakery-style look.
- Serve them slightly warm with vanilla ice cream for an easy dessert that feels indulgent.
- Pack them in a clear box tied with ribbon, they make a thoughtful homemade gift that actually gets eaten.
 Save
Save Every time I pull a batch of these out of the oven, I'm reminded that baking doesn't have to be complicated to be memorable. They're simple, cheerful, and they taste like happiness looks.
Recipe FAQs
- → Why is chilling the dough important?
Chilling for 30 minutes prevents the cookies from spreading too much in the oven, ensuring they hold their shape and maintain that coveted soft, chewy texture throughout baking.
- → Can I use liquid food coloring instead of gel?
Gel food coloring is recommended because it provides vibrant color without adding excess liquid to the dough. Liquid coloring may alter the cookie's texture and require adjusting flour amounts.
- → How do I know when the cookies are done baking?
The edges should appear set and slightly golden while the centers remain soft. They may look slightly underbaked, but this is perfect as they continue cooking on the hot baking sheet and firm up during cooling.
- → Can I make these ahead of time?
Yes! The dough can be refrigerated for up to 3 days before baking. You can also freeze scooped dough balls for up to 3 months—just add 1-2 minutes to the baking time when baking from frozen.
- → What's the best way to store these cookies?
Keep in an airtight container at room temperature for up to 1 week. For longer storage, freeze baked cookies in a freezer-safe bag with parchment paper between layers for up to 3 months.
- → Can I substitute the white chocolate chips?
While white chocolate complements the pink color beautifully, you can use dark chocolate chips, semi-sweet chunks, or even dried cranberries for a different flavor profile and contrast.